


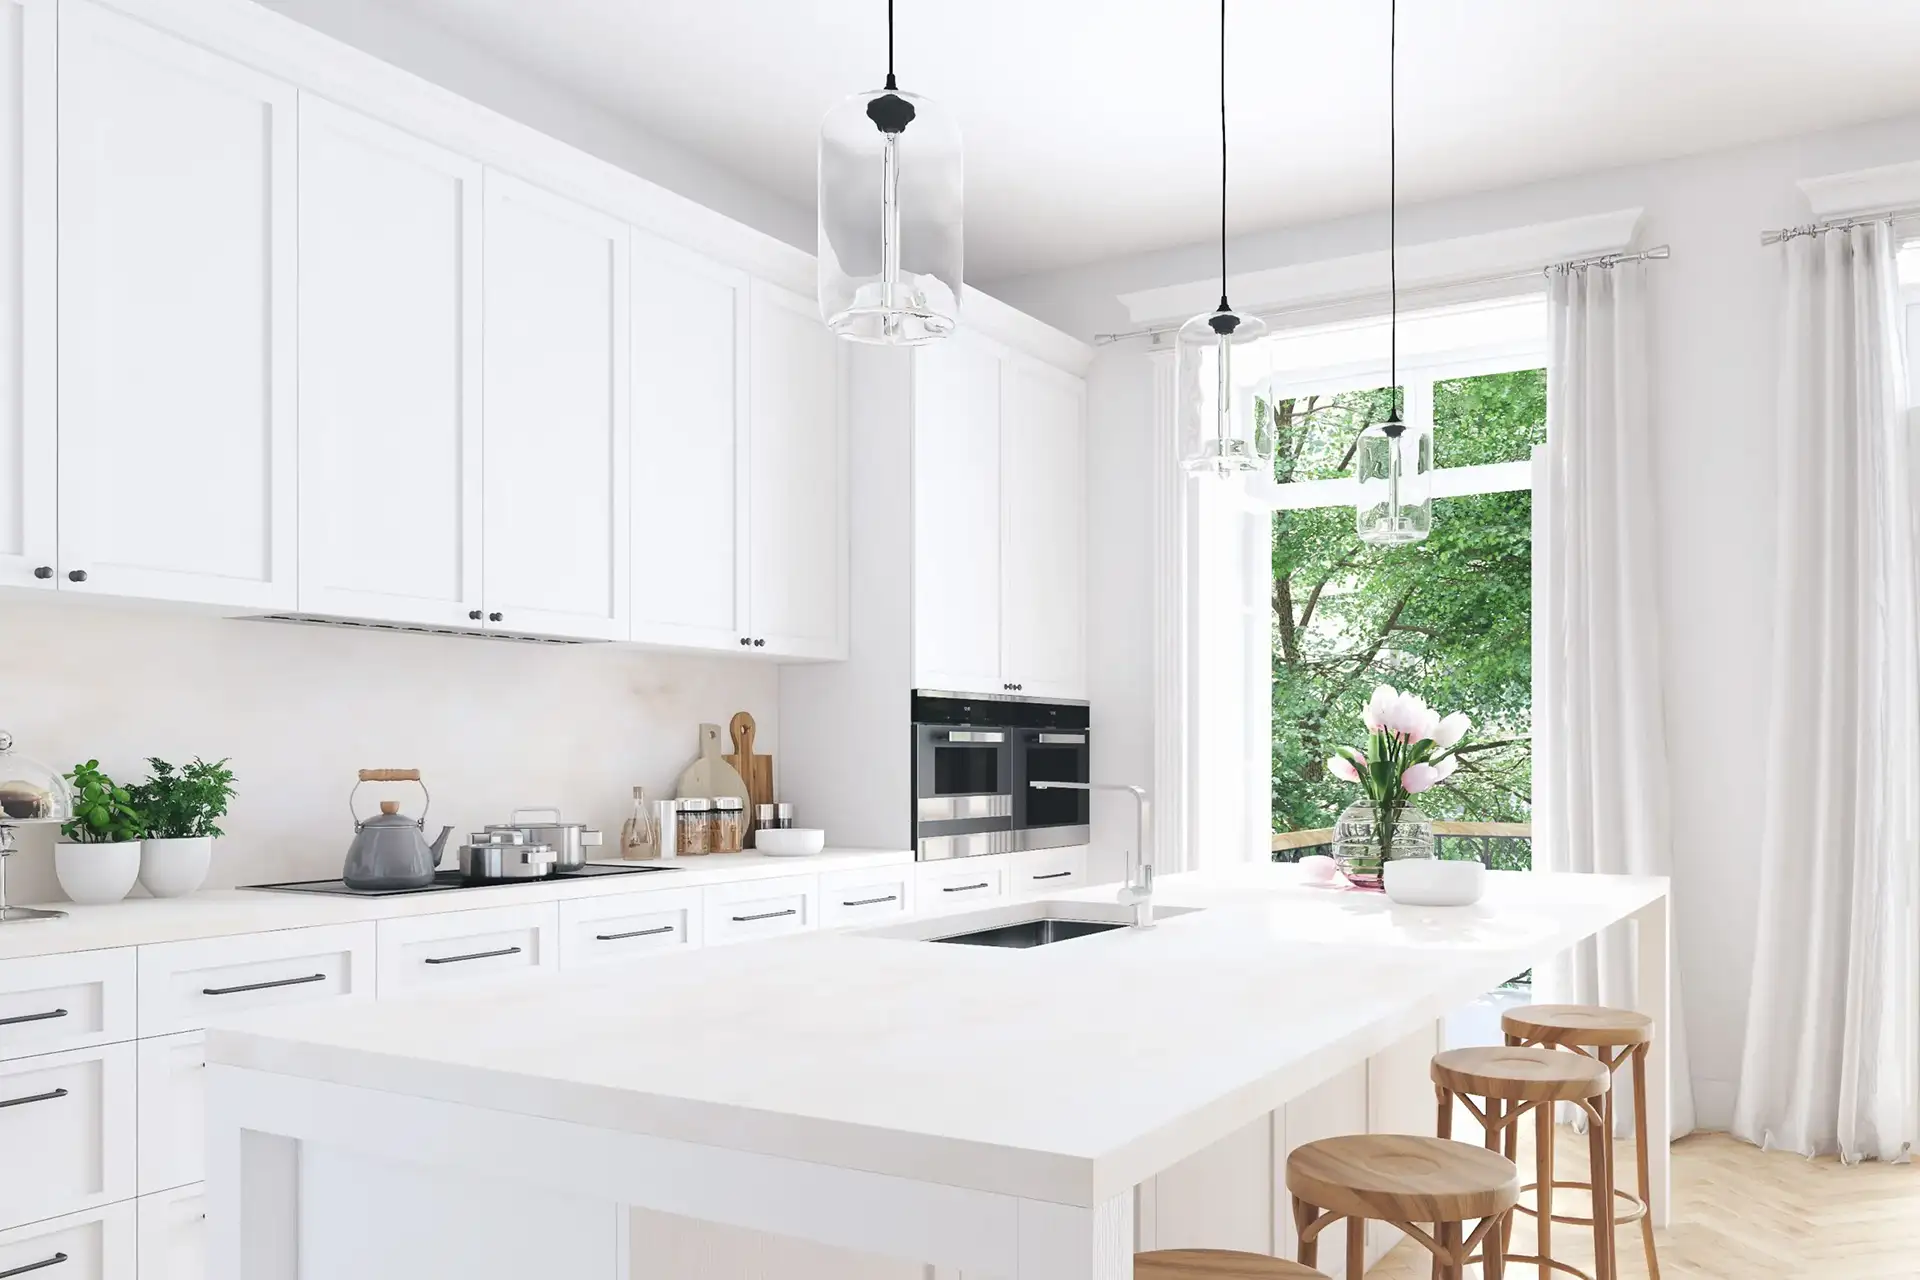
What’s the ultimate design and budget friendly kitchen remodel? IKEA cabinet boxes and custom door faces.
If your cabinet boxes are worn out, damaged, or you need to completely reconfigure your layout, a kitchen remodel might be in order. If you are budget conscious but don’t want to sacrifice on design or quality, using IKEA cabinets for an affordable base with custom fronts can get you that designer look on a budget – and it can be designed, planned, and installed yourself.
We rounded up our top 10 tips to help you get started on planning your custom IKEA kitchen, including handy tips and tricks to navigating the IKEA planner.
All images used for planner guidance in this blog are from the IKEA planner website.
1. Measure your Kitchen Space
Start by measuring the height of the room from floor to ceiling, then the length of each wall. Measure the width and height of windows including trim, their distance from the ceiling and floor, and distance to the nearest corner. Repeat for doors including trim.
Mark down utilities – electrical outlets and switches, plumbing, air vents, bulkheads, drains. If you plan to move any of these utilities, consult a professional to complete the necessary re-configuration.
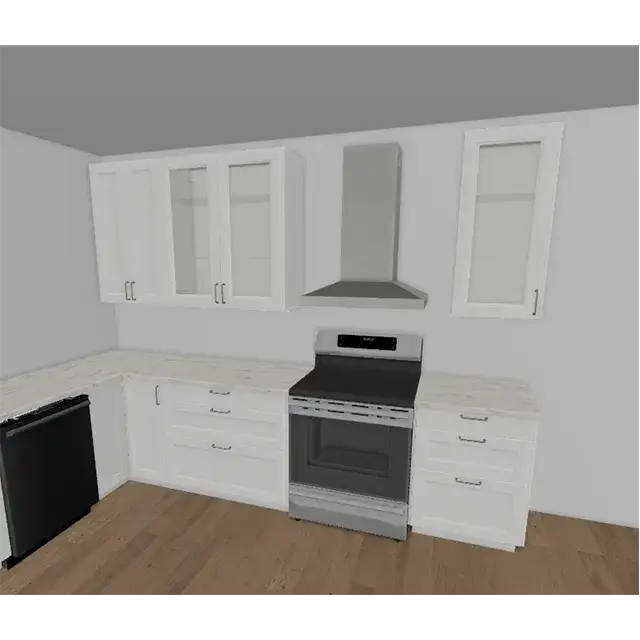
2. Create your Room in the IKEA Planner
First, create an account so you can save your plan(s) for easy access.
Input your room dimensions, then create and insert windows, doors, partial walls or bulkheads where applicable.
You can even add your plumbing pipes and wall outlets to your design for handy visuals as you plan out your design.
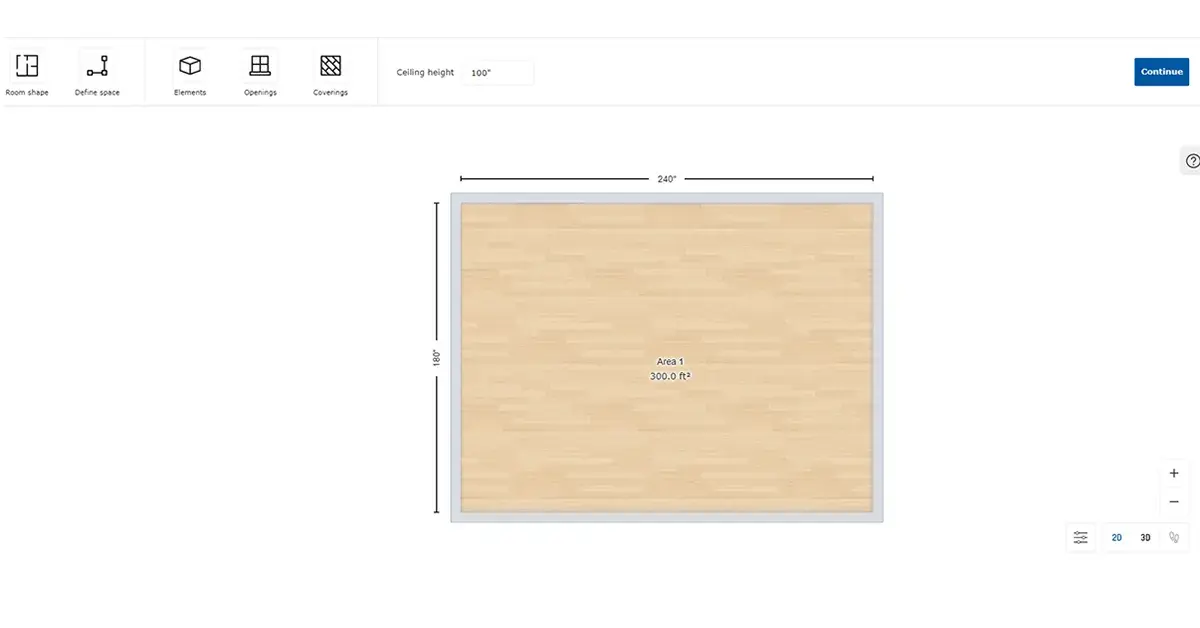
Insert your room size and ceiling height for accurate space planning.
3. Insert Appliances into your Floor Plan
The planning tool has resizable appliances – insert your fridge, stove, dishwasher and vent hood using your current appliance sizes (if keeping what you have), or modify the size to what you intend to order.
Place the appliances at their desired location – noting their proximity to required utilities. If you plan to move water lines or electrical to suit your new layout, don’t worry about locating your appliances where the old ones are!
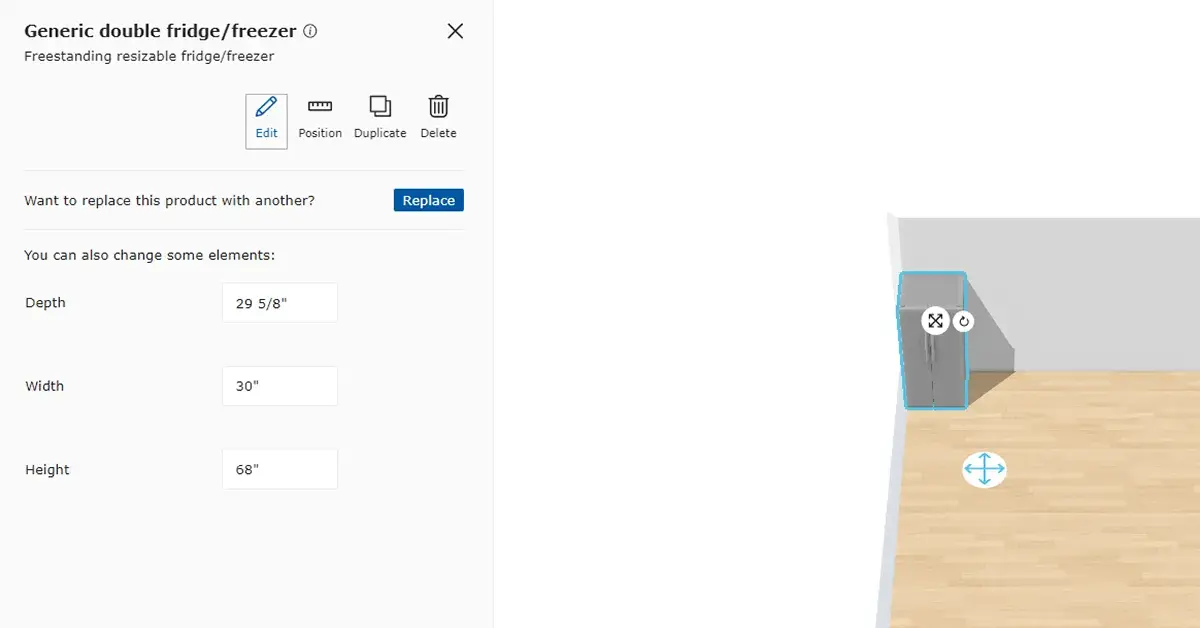
Insert your appliances to match your exact specifications as core pillars in your layout.
4. Evaluate the Functionality Needs in your Kitchen
Consider how you use your space – do you prefer to access dishware and pots in drawers or on shelves? Do you need tall cabinets for pantry food storage or cleaning supplies? Take note of how you currently use your space, what your pain points are, and what changes would increase the functionality of your kitchen.
A helpful exercise is to make a list of everything you’ll need to find a spot for in your new kitchen. Group items into like categories such as: canned food, utensils, baking trays, cutting boards, etc. Create an inventory so you can check off that these items have a home when you are finished with your new design.
5. Choose your Corner Cabinet Style (If Applicable)
If your kitchen layout will have corners – start by choosing the type of corner cabinet that works best for you. Corner cabinets will affect how much remaining space you can fill with other cabinets, so start with these in your floorplan to save you a headache later on!
IKEA has two base corner cabinet options: Lazy Susan and Blind Corner cabinets, with interior organizers you can choose to your liking.

Base corner cabinets are either Lazy Susan or Blind Corner style.
Lazy Susan cabinets are L-shaped and utilize 2 doors fastened together to make the 90 degree corner. Blind corner cabinets require two separate cabinets to turn the corner. The blind corner cabinet has an extended width that the 2nd cabinet butts up against creating the 90 degree turn. Depending on how tight your space is, Lazy Susan corners can tuck in nicely where you’re hoping to maximize the rest of your cabinet storage.
For upper cabinets, IKEA has 45 degree or blind corner cabinet options that can be selected based on your design/space preferences.
6. Plan your Working Triangle
A “working triangle” is the zone between food prep, washing, and storage – and typically refers to your stove/oven, sink, and fridge. Having these zones accessible in a triangular arrangement, free of obstruction from islands or peninsulas creates a highly effective workflow, and means you (and your sous chef) can easily travel between the various stages of meal making.
Using the appliances you inserted into the planner earlier, consider how these three are arranged (don’t worry – you can adjust these if needed once you begin to add cabinets). Keep in mind the location of your water lines, gas supply and electrical when placing appliances.

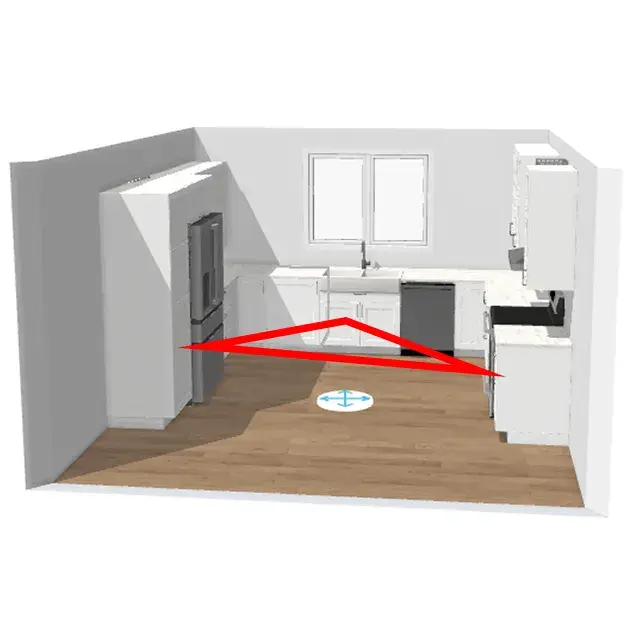
A working triangle allows for smooth flow between food prep, cooking, and washing up.
7. Layout your Base Cabinet Configuration
With your corner cabinets and appliances placed, insert the rest of your base cabinets to fill up your space.
IKEA cabinets come in standard sizes, starting at 12” and available in 3” increments up to 36”. Larger cabinets like 30” and 36” cabinets are typical sizes for sinks, pots and pan drawers, and dishware cabinets.
Start by placing your sink cabinet, then move on to other wide cabinets. Fill in the remaining space with cabinet widths and door/drawer combinations to suit your function needs.
Focus on placement rather than doors vs. drawers to start – you can change the configuration of these later once you have the cabinet sizes determined.
8. Design your Upper Cabinets, Hutches or Floating Shelves
Once your base cabinet layout is settled, consider where (and if) you’d like to add upper cabinets or floating shelves.
Upper cabinets provide great storage hidden away behind doors, or can add a decorative look if used with glass doors
Floating shelves are a gorgeous and on-trend element, and can make a smaller kitchen feel large, but if you worry about keeping shelves neat and tidy – closed doors might be more your style!
Countertop hutches – created out of upper cabinets placed on your counter instead of wall mounted, hutches offer a functional stack of storage without adding congestion to the kitchen. These are a great option for a modern look or if you have lots of windows and want to keep simple, clean lines.
Upper cabinets provide glass or closed-door storage to hide clutter.
9. Add Cover Panels, Trim and Toekick
Exposed sides of IKEA’s frameless cabinets need to be covered with side panels to hide the melamine cabinet box. To add cover panels – click on the cabinet that will need a side panel, click “More” on the right hand menu, and then you’ll be presented with the locations you can choose a cover panel – left/right or back (for islands). Add the appropriate panel here.
Cover panels are used for base and upper cabinets with exposed sides, as well as the sides or backs of islands. Additionally, large fridge panels can be used to frame in your fridge beneath a cabinet, and create a more built-in look.
By default, the IKEA planner adds toekick to hide the feet the cabinets rest on – leave this in the plans as you insert your cabinets.
For upper cabinets, you may want to add light valence and decorative molding to your design. The planner calls Crown Moulding “Soffit” and light valence “decostrip” – to clear any confusion on what those mean! They’re added much like your side panels, click on the upper cabinet, click “more” and then select soffit/deco strip if applicable.
10. How to Order your Custom Fronts for IKEA Cabinets
You’ve got a winning design, now how do you make that come to life with custom doors?
Save your plans as a PDF, with all design views so we can see your vision!
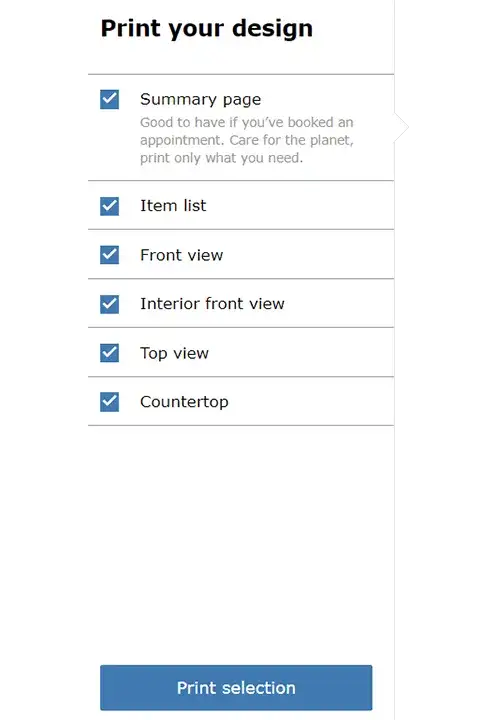
Check off all views, then click Print and save your design as a PDF.
Next, you can either place your order working from the planner itemlist for the doors, drawer faces, panels, and trim you’ll need from us, OR send in your IKEA plans with doors still on – we work from these dimensions to create your quote.
Before ordering your cabinets and accessories from IKEA, be sure to REMOVE the products you’re ordering custom – doors, drawer faces, panels, trim and toekick. This will reduce your order to only the IKEA products you need like cabinet boxes, feet, suspension rail, hinges, drawers and other accessories.
Final tips to make planning your IKEA kitchen a breeze:
- Place 2” fillers between cabinets and walls, so your doors open properly without smashing into the wall!
- Ensure aisles are a minimum of 48” where doors open on both sides of the aisle so they don’t bump into each other
- When adding products into the IKEA planner – click the product, then wait for it to populate in your design. Don’t drag and drop from the item menu – this doesn’t work!
With these helpful tips and tricks, designing and planning your custom IKEA kitchen can be simpler than you think! Stay tuned for the rest of our tips, IKEA hacks and ways to customize your IKEA kitchen for a magazine ready look without the price tag.
IKEA is a registered trademark of Inter-IKEA Systems B.V. and is not affiliated with Nieu Cabinet Doors.


